programming

TensorFlow with Jupyter Notebooks using Virtualenv

Been trying to learn TensorFlow by working on the Udacity Deep Learning mooc.  All the programming assignments are based on Jupyter Notebooks.  Unfortunately, since I setup my computer with a NVIDIA GPU I've been using Virtualenv to mange my Python distributions as recommended in the Tensorflow installation documents.  However, I've had a really hard time getting IPython and Jupyter configured so I can access all the packages I needed until I read this.

The solution is quite simple.  From your tensorflow environment, first install ipykernel. Then you register the kernel with the tensorflow environment.

$ source ~/tensorflow/bin/activate
$ pip install ipykernel
$ python -m ipykernel install --user --name=tensorflow

Finally, when you open your notebook you will have to change kernels from the default Python ones to the special tensorflow one.  
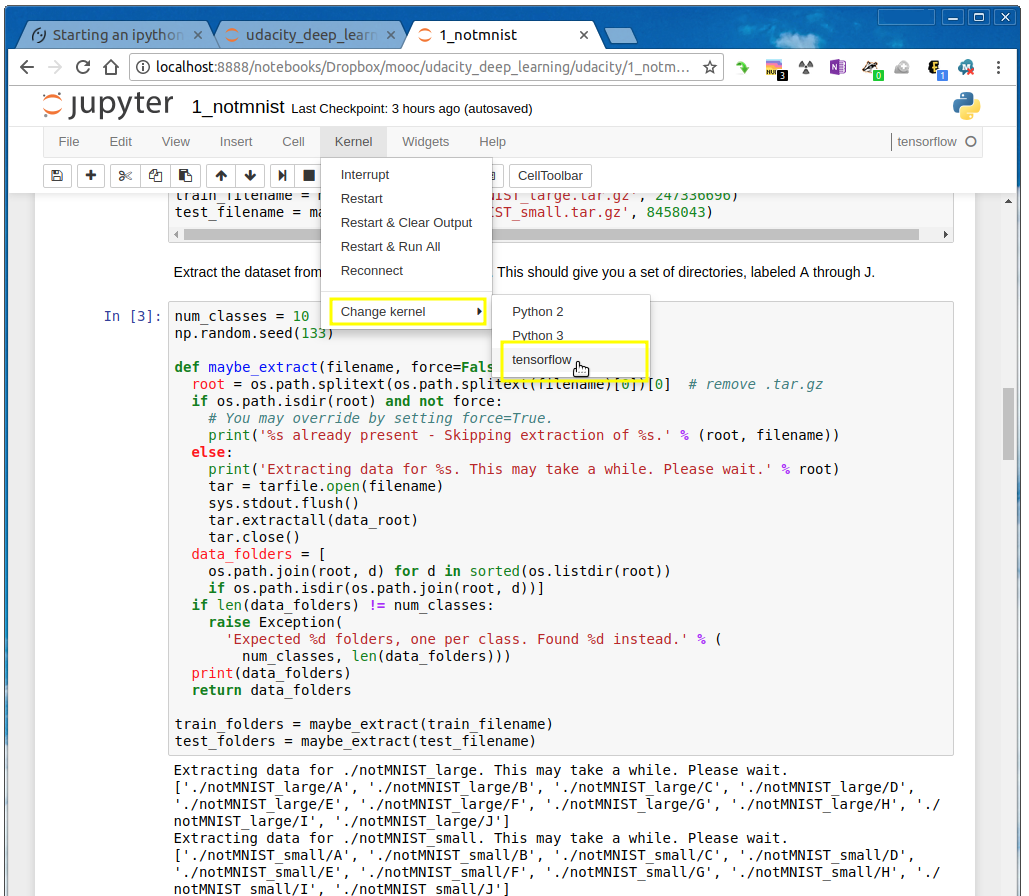
jupyter_notebook_virtualenv(edit).png

Installing OpenCV 3.4 on Ubuntu 17.10

I found this nifty guide on installing OpenCV 3 on Ubuntu 16.04.   Although I have Ubuntu 17.10 this guide is still incredibly useful.  I'd like to share some tweaks I when I was following the guide to get OpenCV setup.

To be clear, I have Ubuntu 17.10.  I am installing OpenCV 3.4.0 and Python 3.6.3 which are the latest versions as of Feb 3, 2018.  The guide uses OpenCV 3.1 and Python 3.5.2 on Ubuntu 16.04.

Basically, I followed the guide exactly as written for Python 3 except for the following tweaks below.  I didn't bother with Python 2 configuration.

Step #1 modifications

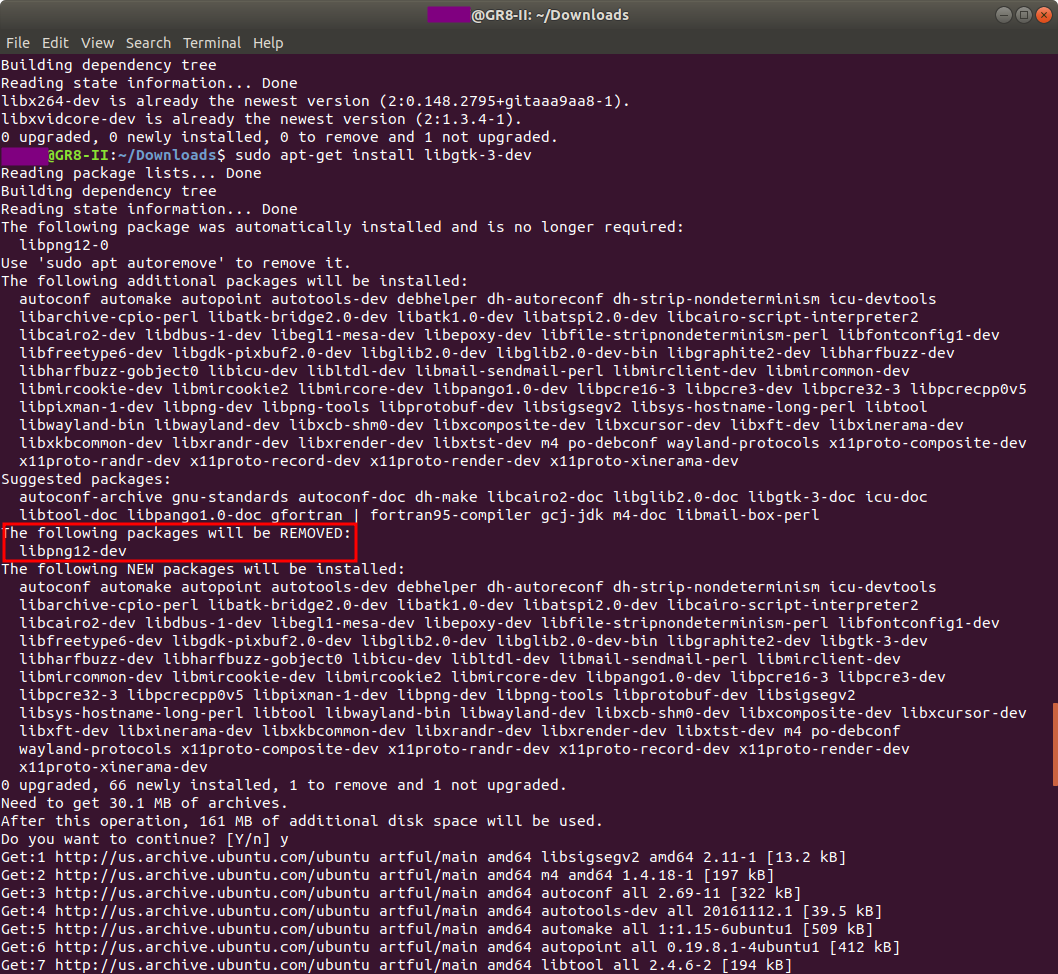
I had issues installing libpng12-devapt-get couldn't find the package so I had to update /etc/apt/sources.list as suggested here to include the following line:

deb http://mirrors.kernel.org/ubuntu xenial main

However, you might be able to skip libpng12-dev altogether since installing libgtk-3-dev later on in the guide seems to uninstall libpng12-dev.

Figure 1: No need for libpng12-dev

Figure 1: No need for libpng12-dev

To get the headers and libraries for Python 3.6:

$ sudo apt-get install python3.6-dev

Finally, you need to install Qt 5.  In the past, I don't think we need to install this.  Maybe a recent dependency change?

$ sudo apt-get install qt5-default


Step #2 modifications

Instead of using wget to download OpenCV 3.1.0 I just downloaded the latest version 3.4.0 from the official GitHub repo https://github.com/opencv/opencv/archive/3.4.0.zip.

Likewise, I instead of using wget to pull opencv_contrib I pulled the latest from GitHub https://github.com/opencv/opencv_contrib.  On the web page, just click "Clone or download" on the top right to get the zip file: no need to use git.


Step #4 modifications

Since I installed a different version of OpenCV and related contributed code, my directory names are slightly different.  Also, I don't like building stuff in the root of my home directory. 

More importantly, my machine has TensorFlow with GPU support installed.  However, I couldn't get OpenCV to build properly with GPU support so I had to turn support off.  Notice the last part "WITH_CUDA=OFF". Also, we need to enable QT.

$ cd ~/Downloads/opencv-3.4.0/
$ mkdir build
$ cd build
$ cmake -D CMAKE_BUILD_TYPE=RELEASE \
    -D CMAKE_INSTALL_PREFIX=/usr/local \
    -D INSTALL_PYTHON_EXAMPLES=ON \
    -D INSTALL_C_EXAMPLES=OFF \
    -D OPENCV_EXTRA_MODULES_PATH=~/Downloads/opencv_contrib-3.4.0/modules \
    -D PYTHON_EXECUTABLE=~/.virtualenvs/cv/bin/python \
    -D BUILD_EXAMPLES=ON \
    -D WITH_QT=ON \
    -D WITH_CUDA=OFF  ..

Step #5 modifications

My OpenCV library binary came out with a different name and in a different directory than the ones in the guide which is expected. 

Here is where I found my build library.

$ ls -l /usr/local/lib/python3.6/site-packages/

To change the binding name:

$ cd /usr/local/lib/python3.6/site-packages/
$ sudo mv cv2.cpython-36m-x86_64-linux-gnu.so cv2.so

To symlink binding into virtualenv:

$ cd ~/.virtualenvs/cv/lib/python3.6/site-packages/
$ ln -s /usr/local/lib/python3.6/site-packages/cv2.so cv2.so

Step #6 changes

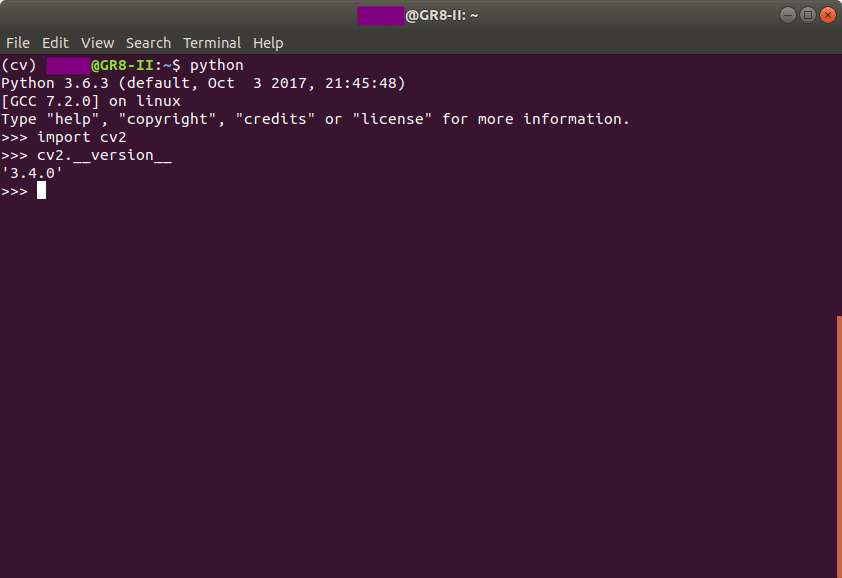
This is a screenshot of what Python 3.6.3 looks like with OpenCV 3.4.0 bindings.

Figure 3: Success!

Figure 3: Success!

I hope you find this micro-guide useful.

Source: http://rndness.com/

Vanderbilt's Android App Component MOOC


I just completed the Android App Components - Intents, Activities, and Broadcast Receivers MOOC taught by Vanderbilt University on Cousera.  Since I did pay $49 for the course, I'd like to share my thoughts.  

This is definitely a useful class.  I think if you plan to be an Android developer, its important to understand the intricacies of the architecture and structure of apps.  I was disappointed by the fact that there were no mandatory programming assignments.  Also, beyond the normal instructional videos, there were a lot of videos on code walk-throughs.  After a certain point my brain just shut down.

Will you learn how to program Android with this class alone? Absolutely not.  Will it explain how to app screens communicate with services and other screens? Yes.  Will you be able to implement real Android apps without other courses/education? No.

This class is part  of the Android App Development Specialization.  I think you need to take most of these classes before you can really start Android development.  Is this MOOC worth $49?  Yes, only if you plan to complete the whole specialization.

OBTW, I did find out that Udacity has an interesting single MOOC course on Android development. It would have probably made more sense to try that first before going down this more academic route.


Google Hates Computer Code

Recently, I picked up a nice technical book on Fast Fourier Transforms.  The good thing about the book was that it wasn't deep into mathematical proofs and it contained small self-contained pieces of code.  The bad thing about the book is that all the code is in BASIC and some of the code is quite long to type by hand.

It dawned on my that if you load images into Google Docs it will automatically OCR the file for you.  I also have 10 year old Xerox scanner with some old software called PaperPort that handles scanning, OCR and document management.  I'd figure that modern Google cloud software would be way better than desktop software.  I was really wrong.

I took some photographs of pages that contained BASIC code in my book with iPhone 4.   Its not a great image but a company such as Google that can build self-driving cars should be able to adjust images automatically, right?

 
Some DFT code written in BASIC.

Some DFT code written in BASIC.


On my desktop computer, I uploaded the images to Google Drive.  Then for each file, I imported them into Google Docs.  The import process automatically creates a new Google Doc with both the original image and the OCR'd text.  For a comparison, I used my ancient Windows XP-era PaperPort to OCR my images.  Here is the output for each side-by-side.

Its absolutely mind blowing how poorly Google Docs OCR performed. Its really, really bad: I  see bits of Chinese characters and the formatting is all over the place.  The output is completely unusable.  On the other hand, the PaperPort OCR output was quite good.  The main issues were the insertion of spaces that didn't exist and confusing the letter O with the number 0. 

Frankly, the Google translation is so bad  I might have as well as dropped my book onto my keyboard and use whatever it typed as the code translation.  Unacceptable Google.