Python

TensorFlow with Jupyter Notebooks using Virtualenv

Been trying to learn TensorFlow by working on the Udacity Deep Learning mooc.  All the programming assignments are based on Jupyter Notebooks.  Unfortunately, since I setup my computer with a NVIDIA GPU I've been using Virtualenv to mange my Python distributions as recommended in the Tensorflow installation documents.  However, I've had a really hard time getting IPython and Jupyter configured so I can access all the packages I needed until I read this.

The solution is quite simple.  From your tensorflow environment, first install ipykernel. Then you register the kernel with the tensorflow environment.

$ source ~/tensorflow/bin/activate
$ pip install ipykernel
$ python -m ipykernel install --user --name=tensorflow

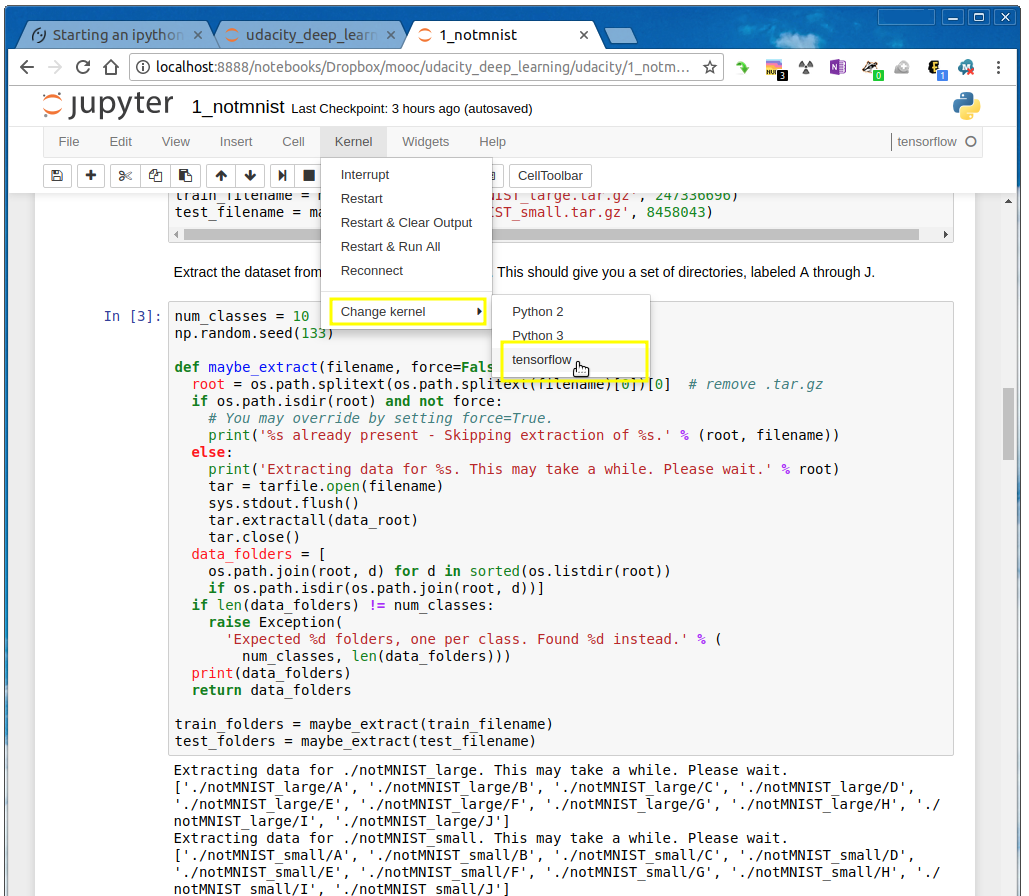
Finally, when you open your notebook you will have to change kernels from the default Python ones to the special tensorflow one.  

jupyter_notebook_virtualenv(edit).png

Installing OpenCV 3.4 on Ubuntu 17.10

I found this nifty guide on installing OpenCV 3 on Ubuntu 16.04.   Although I have Ubuntu 17.10 this guide is still incredibly useful.  I'd like to share some tweaks I when I was following the guide to get OpenCV setup.

To be clear, I have Ubuntu 17.10.  I am installing OpenCV 3.4.0 and Python 3.6.3 which are the latest versions as of Feb 3, 2018.  The guide uses OpenCV 3.1 and Python 3.5.2 on Ubuntu 16.04.

Basically, I followed the guide exactly as written for Python 3 except for the following tweaks below.  I didn't bother with Python 2 configuration.

Step #1 modifications

I had issues installing libpng12-devapt-get couldn't find the package so I had to update /etc/apt/sources.list as suggested here to include the following line:

deb http://mirrors.kernel.org/ubuntu xenial main

However, you might be able to skip libpng12-dev altogether since installing libgtk-3-dev later on in the guide seems to uninstall libpng12-dev.

Figure 1: No need for libpng12-dev

Figure 1: No need for libpng12-dev

To get the headers and libraries for Python 3.6:

$ sudo apt-get install python3.6-dev

Finally, you need to install Qt 5.  In the past, I don't think we need to install this.  Maybe a recent dependency change?

$ sudo apt-get install qt5-default


Step #2 modifications

Instead of using wget to download OpenCV 3.1.0 I just downloaded the latest version 3.4.0 from the official GitHub repo https://github.com/opencv/opencv/archive/3.4.0.zip.

Likewise, I instead of using wget to pull opencv_contrib I pulled the latest from GitHub https://github.com/opencv/opencv_contrib.  On the web page, just click "Clone or download" on the top right to get the zip file: no need to use git.


Step #4 modifications

Since I installed a different version of OpenCV and related contributed code, my directory names are slightly different.  Also, I don't like building stuff in the root of my home directory. 

More importantly, my machine has TensorFlow with GPU support installed.  However, I couldn't get OpenCV to build properly with GPU support so I had to turn support off.  Notice the last part "WITH_CUDA=OFF". Also, we need to enable QT.

$ cd ~/Downloads/opencv-3.4.0/
$ mkdir build
$ cd build
$ cmake -D CMAKE_BUILD_TYPE=RELEASE \
    -D CMAKE_INSTALL_PREFIX=/usr/local \
    -D INSTALL_PYTHON_EXAMPLES=ON \
    -D INSTALL_C_EXAMPLES=OFF \
    -D OPENCV_EXTRA_MODULES_PATH=~/Downloads/opencv_contrib-3.4.0/modules \
    -D PYTHON_EXECUTABLE=~/.virtualenvs/cv/bin/python \
    -D BUILD_EXAMPLES=ON \
    -D WITH_QT=ON \
    -D WITH_CUDA=OFF  ..

Step #5 modifications

My OpenCV library binary came out with a different name and in a different directory than the ones in the guide which is expected. 

Here is where I found my build library.

$ ls -l /usr/local/lib/python3.6/site-packages/

To change the binding name:

$ cd /usr/local/lib/python3.6/site-packages/
$ sudo mv cv2.cpython-36m-x86_64-linux-gnu.so cv2.so

To symlink binding into virtualenv:

$ cd ~/.virtualenvs/cv/lib/python3.6/site-packages/
$ ln -s /usr/local/lib/python3.6/site-packages/cv2.so cv2.so

Step #6 changes

This is a screenshot of what Python 3.6.3 looks like with OpenCV 3.4.0 bindings.

Figure 3: Success!

Figure 3: Success!

I hope you find this micro-guide useful.

Source: http://rndness.com/