Configuring Wake-on-Lan over Wi-Fi for the Asus GR8 II

They said it couldn't be done.  Setting up Wake-On-Lan over Wi-Fi.  They were wrong.

A few weeks ago I've tried setting up Wake-On-Lan on my Asus X99 based Windows 10 machine.  I tweaked the Wi-Fi driver, Windows and the BIOS but I just couldn't get it to work.  When I got my new Asus GR8 II with Ubuntu 17.10 installed I figured I give it a try. 

Fortunately, I found this great guide.  It made it look really easy.  It was.  It only took three commands!

$ iw phy0 wowlan show
WoWLAN is disabled.

$ sudo iw phy0 wowlan enable magic-packet disconnect
$ iw phy0 wowlan show
WoWLAN is enabled:
 * wake up on disconnect
 * wake up on magic packet

BTW, APM configuration was the default: ErP set to Enable(S5).
 

TensorFlow with Jupyter Notebooks using Virtualenv

Been trying to learn TensorFlow by working on the Udacity Deep Learning mooc.  All the programming assignments are based on Jupyter Notebooks.  Unfortunately, since I setup my computer with a NVIDIA GPU I've been using Virtualenv to mange my Python distributions as recommended in the Tensorflow installation documents.  However, I've had a really hard time getting IPython and Jupyter configured so I can access all the packages I needed until I read this.

The solution is quite simple.  From your tensorflow environment, first install ipykernel. Then you register the kernel with the tensorflow environment.

$ source ~/tensorflow/bin/activate
$ pip install ipykernel
$ python -m ipykernel install --user --name=tensorflow

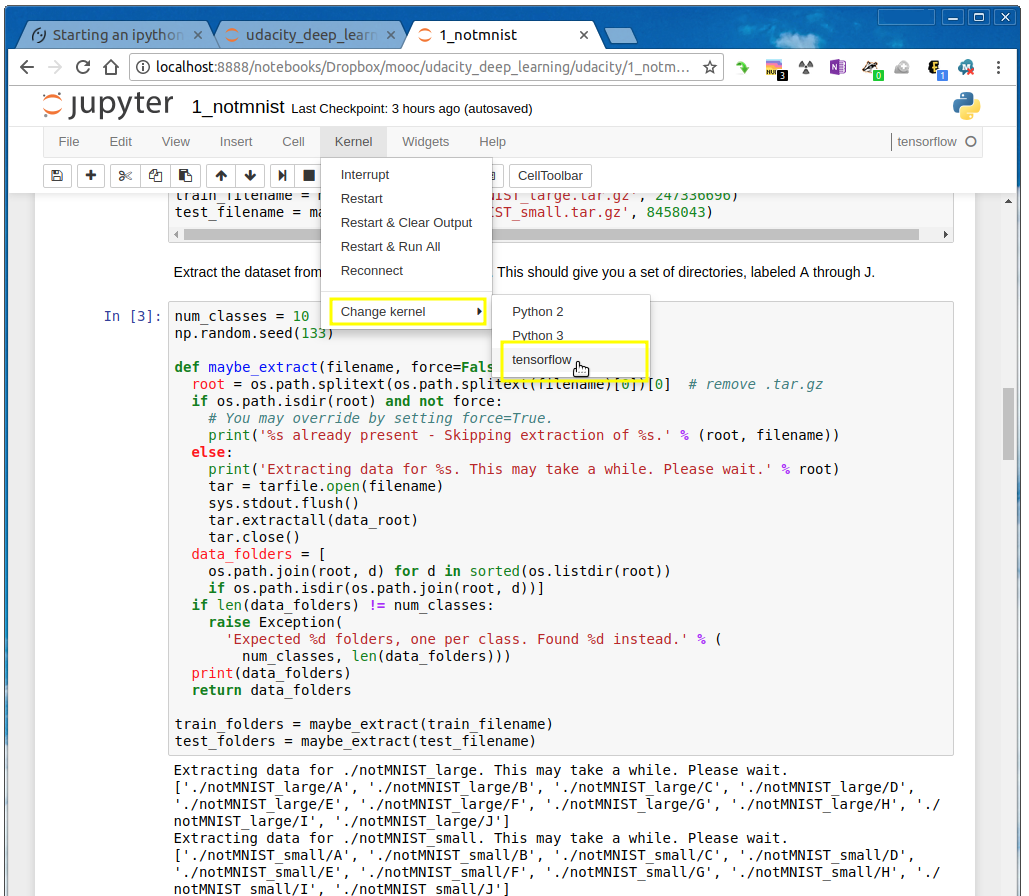
Finally, when you open your notebook you will have to change kernels from the default Python ones to the special tensorflow one.  

jupyter_notebook_virtualenv(edit).png

Installing OpenCV 3.4 on Ubuntu 17.10

I found this nifty guide on installing OpenCV 3 on Ubuntu 16.04.   Although I have Ubuntu 17.10 this guide is still incredibly useful.  I'd like to share some tweaks I when I was following the guide to get OpenCV setup.

To be clear, I have Ubuntu 17.10.  I am installing OpenCV 3.4.0 and Python 3.6.3 which are the latest versions as of Feb 3, 2018.  The guide uses OpenCV 3.1 and Python 3.5.2 on Ubuntu 16.04.

Basically, I followed the guide exactly as written for Python 3 except for the following tweaks below.  I didn't bother with Python 2 configuration.

Step #1 modifications

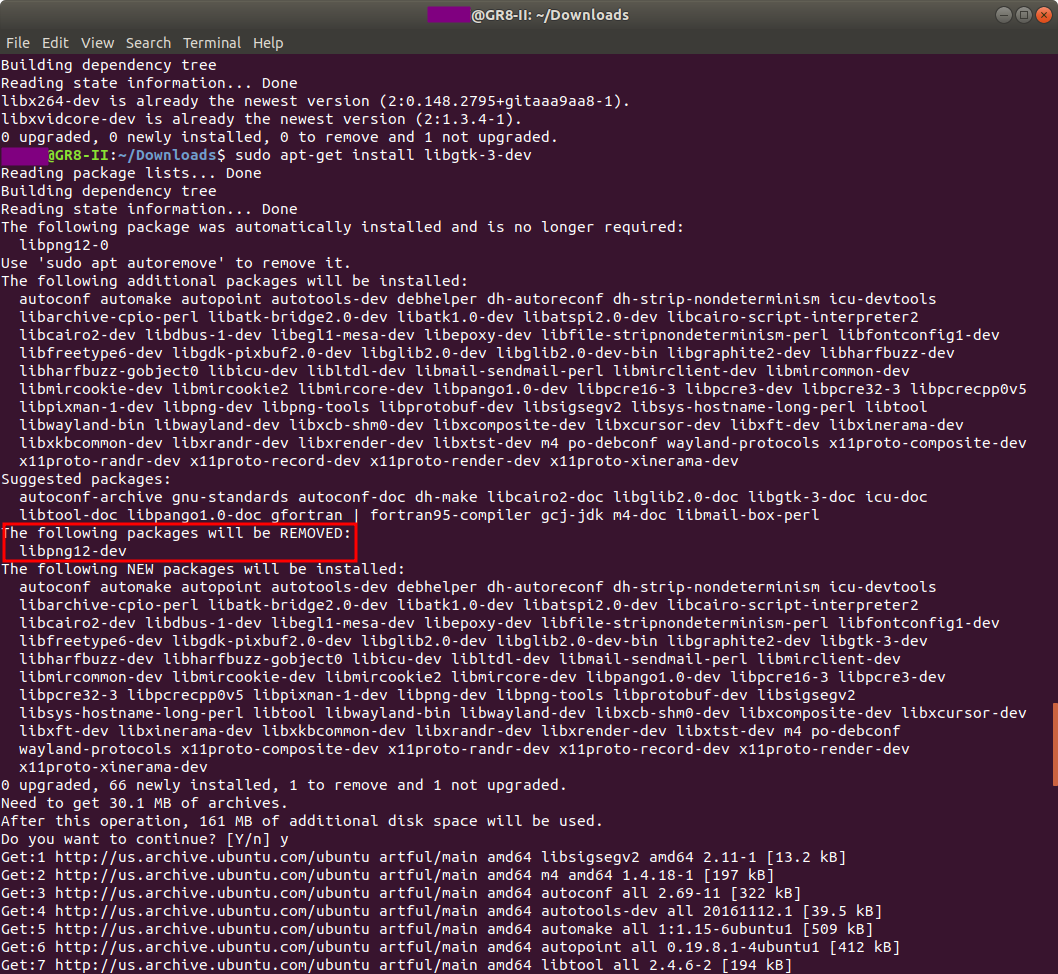
I had issues installing libpng12-devapt-get couldn't find the package so I had to update /etc/apt/sources.list as suggested here to include the following line:

deb http://mirrors.kernel.org/ubuntu xenial main

However, you might be able to skip libpng12-dev altogether since installing libgtk-3-dev later on in the guide seems to uninstall libpng12-dev.

Figure 1: No need for libpng12-dev

Figure 1: No need for libpng12-dev

To get the headers and libraries for Python 3.6:

$ sudo apt-get install python3.6-dev

Finally, you need to install Qt 5.  In the past, I don't think we need to install this.  Maybe a recent dependency change?

$ sudo apt-get install qt5-default


Step #2 modifications

Instead of using wget to download OpenCV 3.1.0 I just downloaded the latest version 3.4.0 from the official GitHub repo https://github.com/opencv/opencv/archive/3.4.0.zip.

Likewise, I instead of using wget to pull opencv_contrib I pulled the latest from GitHub https://github.com/opencv/opencv_contrib.  On the web page, just click "Clone or download" on the top right to get the zip file: no need to use git.


Step #4 modifications

Since I installed a different version of OpenCV and related contributed code, my directory names are slightly different.  Also, I don't like building stuff in the root of my home directory. 

More importantly, my machine has TensorFlow with GPU support installed.  However, I couldn't get OpenCV to build properly with GPU support so I had to turn support off.  Notice the last part "WITH_CUDA=OFF". Also, we need to enable QT.

$ cd ~/Downloads/opencv-3.4.0/
$ mkdir build
$ cd build
$ cmake -D CMAKE_BUILD_TYPE=RELEASE \
    -D CMAKE_INSTALL_PREFIX=/usr/local \
    -D INSTALL_PYTHON_EXAMPLES=ON \
    -D INSTALL_C_EXAMPLES=OFF \
    -D OPENCV_EXTRA_MODULES_PATH=~/Downloads/opencv_contrib-3.4.0/modules \
    -D PYTHON_EXECUTABLE=~/.virtualenvs/cv/bin/python \
    -D BUILD_EXAMPLES=ON \
    -D WITH_QT=ON \
    -D WITH_CUDA=OFF  ..

Step #5 modifications

My OpenCV library binary came out with a different name and in a different directory than the ones in the guide which is expected. 

Here is where I found my build library.

$ ls -l /usr/local/lib/python3.6/site-packages/

To change the binding name:

$ cd /usr/local/lib/python3.6/site-packages/
$ sudo mv cv2.cpython-36m-x86_64-linux-gnu.so cv2.so

To symlink binding into virtualenv:

$ cd ~/.virtualenvs/cv/lib/python3.6/site-packages/
$ ln -s /usr/local/lib/python3.6/site-packages/cv2.so cv2.so

Step #6 changes

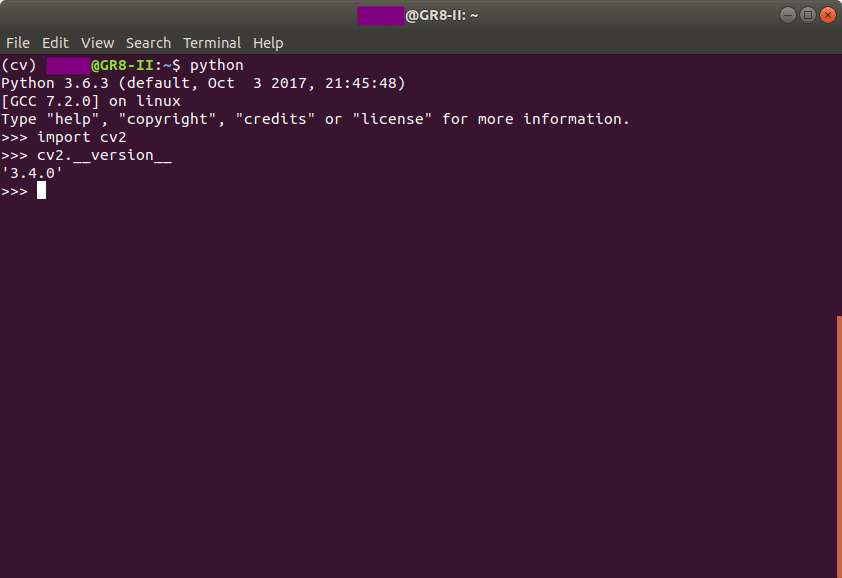
This is a screenshot of what Python 3.6.3 looks like with OpenCV 3.4.0 bindings.

Figure 3: Success!

Figure 3: Success!

I hope you find this micro-guide useful.

Source: http://rndness.com/

FUTURE LABS AI SUMMIT

 
Yann LeCun on Star Craft AI

Yann LeCun on Star Craft AI


Yesterday, I attended the NYU's Future Labs AI Summit event.  Frankly, it wasn't what I expected.  Most of the "more technical" talks were very superficial on the state of the art: very little in depth details on any specific research.  The other talks were focused on the world of start ups focused on AI/Machine Learning based in NYC.  I think it was best suited for venture capitalists who wanted to take the afternoon off from work. 😉

The one slide I found interesting Yann LeCun's discussion on reinforcement learning used for Star Craft.  During his talk, he asserted the future of machine learning is in unsupervised learning. [Mic drop]


Vanderbilt's Android App Component MOOC


I just completed the Android App Components - Intents, Activities, and Broadcast Receivers MOOC taught by Vanderbilt University on Cousera.  Since I did pay $49 for the course, I'd like to share my thoughts.  

This is definitely a useful class.  I think if you plan to be an Android developer, its important to understand the intricacies of the architecture and structure of apps.  I was disappointed by the fact that there were no mandatory programming assignments.  Also, beyond the normal instructional videos, there were a lot of videos on code walk-throughs.  After a certain point my brain just shut down.

Will you learn how to program Android with this class alone? Absolutely not.  Will it explain how to app screens communicate with services and other screens? Yes.  Will you be able to implement real Android apps without other courses/education? No.

This class is part  of the Android App Development Specialization.  I think you need to take most of these classes before you can really start Android development.  Is this MOOC worth $49?  Yes, only if you plan to complete the whole specialization.

OBTW, I did find out that Udacity has an interesting single MOOC course on Android development. It would have probably made more sense to try that first before going down this more academic route.


Evernote Shit Show


Unless you've been living under a rock, Evernote is in a death spiral..  You don't need to be a VC to know that giving away free services competing directly with Microsoft's One Note  isn't such a great idea.

Today, I needed to pull some data off of one of my Evernote notes.  I know a few days ago, Evernote is forcing its free service users to a limit of only 2 clients.  Over the past several years, I must have installed Evernote client on 7 or more devices.  Today, I wasn't ready today to just pick two devices so I decided to log on to Evernote using my tablet's web browser.  Guess what?  Evernote is blocking web access!  They want everyone to use their mobile client on our mobile devices.  Without web access on your devices, you will be forced to upgrade to a paid plan if you own more than two devices. Their web error page even has a URL to the web app.  Fuck you Evernote.